DIY Farmhouse Dining Room Makeover.


When we moved, I knew that that our old dining room set wouldn’t fit into the style of our new home, because it was a little outdated, BUT I also didn’t want to purchase a brand new one either. We weren’t sure what style we were going for since we have plans to add a dry bar in the future.

This was our dining room table before the makeover.

So, what did I do? I turned to Pinterest, of course.

My “Pinspiration.”

I fell in love with the table above, but knew I wasn’t going to spend that amount… especially when I had no idea how long we would be keeping this table! So, I used this as my inspiration and headed to Home Depot to purchase these four items:

All of these items cost me about $60 with the coupon I had. I decided to invest in a higher quality chalk brush because I wanted something that would last me long term so I can makeover multiple pieces of furniture. After the dining room set was in our garage aka my “she-shed,” I began cleaning and scrubbing the chairs and table focusing on removing all of the dirt and dust so that the paint could be applied evenly.

I removed the seats from the chairs and poured half a cup of paint into my Handy Paint Pail and also added a teaspoon of water to prevent it from thickening. What I love about chalk paint is that you don’t have to sand prior to painting — it saves SO much time! Also, you really can’t go wrong with the technique on how you paint, especially with the first coat. When the first coat of the chairs was completed, I then started to paint the base of the table after Jake helped me remove the top of the table. Once I completed the base of the table, I started on my second coat on the chairs and continued the same for the base. Then, all pieces were left overnight to dry.

Before and After.

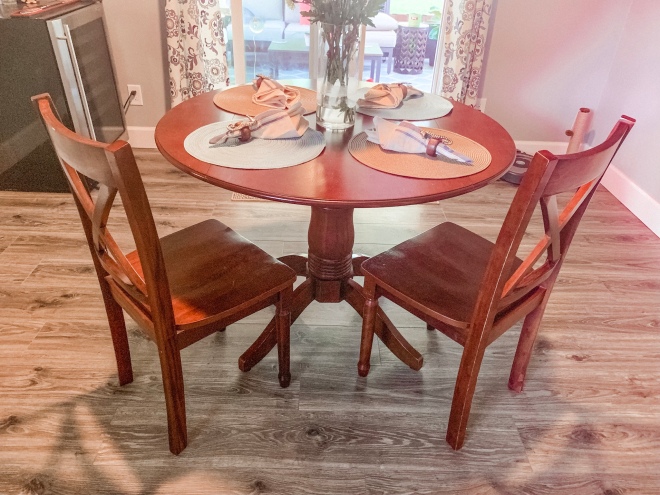
The next morning, I applied multiple coats of the water based polyurethane because this was and is such a high traffic piece of furniture for us. (We eat at the table every day almost twice a day.) Once the coats were completely dry on both the painted pieces and the wood pieces, we then put everything back together. We were quite shocked by the finished look and more excited that we saved some money making over a piece of furniture we already had!

We LOVE the final look – what about you?! We feel that it brightens up the space and we ended up purchasing this rug from Overstock to complete the look!

Have you used chalk paint before? What projects have you completed and do you have any tips to share?! Please leave your comments below!

Surprise me, Daufuskie!

Since it’s my first “throwback Thursday” I thought it would be fitting to share the one of the first trips we had together. It was my first birthday spent with Jake, so I was really hoping it was going to be a good one! As the date was approaching, Jake told me that he had a surprise for my birthday, but couldn’t tell me where we were going or many details because he didn’t want to spoil the surprise. I immediately got excited and nervous. Are you one of those people who feel like when you’re not in control, things aren’t OK?! I am! So, while I was excited and eager to find out what the surprise was, I was also miserable inside not knowing what to expect. “What do I bring? What kind of weather will it be? What kind of clothing do I bring? What if…etc.” Gotta love anxiety, right?! Jake of course did give me some hints as what to bring, but he didn’t want to give it away, so he kept it to a minimum.

On the day of my birthday, we packed the bags in the car and had a delicious breakfast at Collins Quarter. I then became confused and excited when we ended up at Bull River Marina. I really did not know what to expect, that was until the Captain of the boat spilled the surprise. Jake was a little disappointed, but I was super excited to find out that he was taking me to Daufuskie Island, SC! We have both been wanting to go for awhile, but knew it wasn’t easily accessible. For those who aren’t familiar with Daufuskie Island, it’s a small island accessible by boat between Savannah, GA and Hilton Head, SC. This isn’t your typical island, there are only a few roads, one or two places to purchase groceries and the popular method of transportation is golf cart. It’s such a beautiful,intriguing, mysterious island — I highly suggest you make a trip to visit. For more information about the island, click this link:

Once we arrived on the island, there was a van waiting for us to bring us to our golf cart so THEN we can head to our cute, little one bedroom cottage. It was just what we needed for the weekend since we knew most of our time would be spent outside. We quickly toured the property and hopped back into our golf cart to tour the island.

As we drove around Daufuskie, all we could keep saying is “Daufuskie is gorgeous” and how friendly everyone is. At the time, there were 3 restaurants on the island and it happened to be around lunch time, so we stopped at Old Daufuskie Crab Company. We had excellent service as our server kept providing us with (free) “wrong drink orders.” LOL So you can imagine how great of time we were off to as we were sipping on Scrap Iron on the river.

We adventured around the island, touring the few shops, museums and schools — there is so much history to this island! Did you know that Daufuskie means sharp feather in the Muscogee language because of it’s resemblance?

Our first night, we stayed in due to the nasty storm that occurred, but it was lovely to be in this cozy Daufuskie cottage watching movies and cuddling with Jake. I woke up to breakfast in bed the next morning and was surprised when Jake mentioned that we would be taking a stroll along the beach… on horses! Due to my excitement, I rushed through breakfast and we headed to the horses. Unfortunately, the company that we used is no longer operating on the island due to the hurricanes that came through, but we had such a wonderful experience as you can see. We rode through trails which lead us to the beaches — it was an experience that I will never forget!

We spent the rest of the day on the beach that we had to ourselves! Can you believe that? Not one single person on this beach… it was awesome!

We had dinner at a restaurant that is also no longer operating on the island due to the hurricanes, but it was delicious! After dinner, we headed back to Old Daufuskie Crab Company to enjoy a night of scrap iron and music on the river as we enjoyed this atmosphere better.

The next morning, before we had to head back to Savannah, we took a tour of the Daufuskie Rum Company and had a “few” samples of their rum. We learned about their history, how they make their rum and why their rum is different from most! It was a great experience, the owner was wonderful and we left with a good buzz. LOL

Once we returned our golf cart, we were taken to our ferry which was waiting for us at the dock and brought us back to Savannah. On our ride back, I remember seeing so many dolphins – we couldn’t believe it! It was a great way to end to one of the best trips I’ve ever had. We made so many wonderful memories that weekend that we decided to get married a couple of years later on Daufuskie! That’ll be a blog for another day. LOL If you ever have the opportunity to visit Daufuskie, I highly recommend it — it’s such a fascinating island that is away from the hustle and bustle.

Oh, and I forgot to mention that we had horrible cell service the entire weekend which made us connect even more. I guess that’s why we love Daufuskie so much, because we escape everything and focus on just us.

Turning something old into something ours.

When we first moved into our house, the previous owners left some furniture behind — which was totally fine by me! I knew that I could and would re-purpose anything and everything. One of the items that the left was an espresso entryway shelf. I loved the shelf, but HATED the color. It made the space feel so dark and small. I wish I would’ve taken a before picture, but I guess this is one of those things that you learn along the blogging way, right?!

Here is what was hanging in the entryway.

We knew that we had to do something with this area, but we didn’t want to spend a lot of money. Jake gave me a budget of $100, so off to Pinterest I went to look for ideas. And of course, I fell in love with something far too expensive…. as usual.

Cute, right?!

I knew that Jake would immediately say no if I even asked, so I didn’t bother! LOL This wasn’t something we NEEDED — it was something we wanted, therefore we didn’t want to splurge and I agreed with that. So, we made a trip to Walmart and Home Depot to purchase these items:

  • Closet Maid 3 cube bench (at the time was $39.99)
  • Ship-lap ($32.97)
  • Sherwin Williams Showcase paint in ultra white (previously had)
  • Two 44in x 5in boards ($5)
  • Caulk (previously had)
Before the ship-lap and sides. (excuse the bent bins — dogs found out that their toys are hidden in there and helped themselves! LOL

Once we purchased the materials, we removed the baseboards to give it the appearance of being built in. Once those were gone, we secured the bench to the wall. Next, we applied the ship-lap which was SO easy. We’ve never used this kind before and will definitely be using again! We then added the 2 boards and attached those to the sides. Once everything was secured, we then caulked and painted using Sherwin Williams Showcase paint in Ultra White.

Here is the finished look! What do you think?! Best part is that I stayed UNDER budget by $20! Jake was excited and surprised. LOL

Removed the dog toys and NOW the cats hide in there! I need to buy some hard bins. LOL

What are some of your favorite projects that you’ve done around the house?! Comment them below!

Gone Fishing (and sewing).

I love when Jakes mom, Erika and step-dad, Tim visit us – we ALWAYS have a great time. This is probably their 5th visit since we’ve moved — I guess they love our new place as much as we do! LOL

We mostly stayed around the house as this was a relaxing visit for them. Erika brought her sewing machine and helped create our outdoor curtains — which turned out beautiful! (I’ll share that project another day.) While the girls were busy crafting, the guys were out fishing.

We ended up purchasing an annual membership card on our last visit to Fort Pulaski, so that’s where Jake and Tim went to fish.

They caught quite a few fish in a short amount of time too! They had a great time — they caught seven whiting fish and a hammerhead shark.

When the guys got back, they cleaned and gutted the fish and then we grilled them — it was delicious!

What are some of your favorite fishing spots in the low country? Have any fishing tips to share? Please share them below!

Closet Renovation – Part 1

Alison’s side 1 – BEFORE

This was our master walk in closet a couple of days after we moved in — gross, right? We did not have enough space to fold nor hang everything, so we had to come up with a solution and so started our first project.

We headed to Home Depot to pick up a few pieces from the ClosetMaid Closet Systems set in white. We spent around $400 on the supplies, drawers, rods and cabinets and I believe it was totally worth it. Read below to see what we used and the after picture!

Jake’s side – BEFORE

We first started with Jake’s (one) side of the closet since it was going to be the easiest. We purchased this set for him and took about an hour for us to completely set up. We built the shelving units first and then assembled them to the walls. Once that was completed, we then installed the rods. Eventually I would like to change out the rods with either dark wood or black ones — what do you think?!

Jake’s side – AFTER

As you can see, he has plenty of room now to store his clothing and belongings. I tried to convince him that we should purchase cabinet doors for his side, but he declined of course — he wants to make things easier, not more complicated! LOL

Now came for my two sides of the closet. We purchased this fixture for side one and the same fixture as Jake’s for side two. Here are some of the cabinet doors we also purchased: Large top cabinet doors, skinny drawers and large drawers.

Alison’s side 1 AFTER

Last was the third part of our closet. We put together and installed the same system that Jake has on his side. I also wanted to have some smaller shelves, but I am hoping to eventually buy some cabinet doors to cover them up.

Alison’s side 2 – BEFORE (excuse the mess!)
Alison’s side 2 – AFTER

As you can see, everything is much more organized and we can easily find everything we want. Part 2 involves some minor changes such as: painting or applying ship lap, adding a chandelier, changing the knobs, changing the rods and purchase matching hangers. This project all in all took us about 2 days to complete and I’m so grateful that we did this because I can’t stand wire shelving!

What are your thoughts?! What extra projects do you think we should conquer?!

It’s been a year?!

We both can’t believe how quickly this year has gone by — I guess that’s a good thing, right?! We have had many ups and downs, but have continued to grow stronger together and that’s what matters most. We purchased a home, rescued two animals and have accomplished many projects around the house all within a year!

Speaking of projects and anniversaries, we decided to created a traditional anniversary gift that involved something from our wedding.

Since it’s our first wedding anniversary, the traditional gift involves paper for the first year of marriage. We knew that we wanted to incorporate the project around our S that we had our wedding guests sign last year.

We had some left over wood, so Jake measured, cut and stained a frame to fit around our S that we had our wedding guests sign last year. The stain that we used is Varathane’s Aged Wood Accelerator.

Jake then secured the frame to our wall by drilling two holes about 1/4 inch deep so the nails could fit on each side. I forgot to take a picture of this step as Jake was eager to get it up!

And here is the finished product! What do you think?!

Shoes or no shoes?

When I moved in with Jake, we were living in a small duplex in downtown Savannah, GA and certainly did not have enough storage. When we moved into our home last year, we discussed whether or not we would allow shoes inside the house and it was interesting! He thought the idea of taking off his shoes BEFORE he got inside was weird and then he didn’t understand how I would be able to put together my outfits if my shoes were in the garage! LOL

I was raised with the “no shoes in the house” rule so I didn’t mind it. In fact, it was something I had to get used to when I moved in with Jake — I was always in the habit of taking my shoes off at the door, when I didn’t need to and couldn’t leave them by the door. So we both agreed, or actually, I convinced Jake to try the no shoes rule out first. LOL So, we went to Lowe’s to purchase this storage cabinet which cost about $120 and it’s so worth it!

I unfortunately did not take any pictures DURING the installation as we were moving too quickly!

We put together the storage cabinet, which was fairly easy and took little time with both of us helping. We configured the design a bit to what would best suit our needs, which meant that we needed to purchase additional shelves, which also meant we needed to make another trip to Lowe’s. Once we cut and installed the additional shelves, we were able to organize our shoes inside. Unfortunately, Jake was only able to secure the top shelf for his shoes while I needed the rest of the shelves for mine! LOL

Here is the finished product — what do you think?! We loved this storage cabinet SO much that we ended up purchasing another one a few days later for our beach, pool and garden supplies. It’s MONTHS later and we recently talked about purchasing another one for some extra storage — we just love the way it looks so clean and organized in our garage!

So, do you and your family allow shoes in the house?! Leave a comment below.

I can’t believe it..

I created SimplyShemwell.com… finally. It took me MUCH longer than I thought, but I did it. I know I’m going to make SO many mistakes in the beginning and that’s OK… as long as I learn from them, right?!

We wanted to create our blog as a way to share with our friends and family our world. Simply Shemwell is dedicated to all things we love – adventures, crafts, animals & food. We hope you join us on our journey of turning this house into our home. Be patient as we both figure out this blog world!